Labels

Thursday, February 9, 2017

Retro Toys: BD&A Official Licensed Nintendo Bean Bag Plushies

A long long time ago, more specifically the 80's and 90's, it was pretty difficult to find domestic video game merchandise and toys in the United States. My friends, brother, et all, would spend too much money importing anime and video game merchandise from Japan (anyone remember GAME CAVE? Good times.) because it was too hard to find locally and, well, because we were huge nerds. The way I see it, there were 3 majors eras of video game merchandise:


Era 1: Super Mario McDonald's Toy (1989)
Era 1 - 1980s to ~1995: Think those old Nintendo Cereals and cheap poorly designed figurines and McDonald's toy's. If you wanted something really cool then you usually had to order it from Nintendo Power or some kind of catalog.

Era 2 - ~1996 to 2001: Things are picking up. Action figures are being sold in game shops and toy stores. Toys are of better quality (Duke Nukem 3D, Metal Gear Solid, The Legend of Zelda OoT.) Japanese exclusive action figures are being brought over in minimally changed packaging (Bandai's Final Fantasy 7 and 8 line.) This is the Golden Age. While there wasn't as much merch as in Era 3, what you found was usually AWESOME and the fact that you found it felt even more AWESOME. After getting home, you'd usually call someone and be like, "DUDE! You won't believe what I found at FYE!!"

Era 3 - 2002 to Present: The current age. Thanks to society finally (mostly) accepting Video Games and the fact that adults are now allowed to buy toys without feeling too much shame, you can find merchandise mostly anywhere. Everyone has their name in the game. Quality ranges from terrible to masterpiece. For example, my wife bought me Zelda socks from Target this Christmas. That pretty much says everything.

Donkey Kong (1997)
Today's topic comes from Era 2, or what I like to call The Golden Age. This posts takes us back to November 1997 when I was purchasing my first Nintendo 64 game, Mischief Makers, from the Electronics Boutique in Trumbull, CT. While checking out, I noticed that they had a box of small Nintendo Bean Bag toys on the counter for $5 each. Inside was, if I remember correctly, Donkey Kong, Mario, Toad, and Yoshi. Being a broke teenager who just spent the last of his birthday money, I had to suck it up, wipe the drool off my face, and hope like hell they were going to be there next week. I made my purchase, walked out of the store, and waited for my younger brother to finish checking out. To my surprise, my younger brother walks out of EB with Donkey Kong (my favorite) in hand and gives it me as a birthday present. So awesome.

Curiously, I looked the plush over and noticed on the tag that the toy was made by one BD&A: Bensussen Deutsch and Associates. The fuck you say? I remember picturing the toys being made by massive, eccentric, German man-children and refrained from doing any more research because, quite frankly, it was a pretty hilarious mental image. Doing more research now I am seeing that they are in Woodinville, Washington, right outside Redmond, where Nintendo of America is located here in the Pacific Northwest. It totally makes sense.
Diddy Kong (1997)
Luigi (1997)


The line up started with the following ~6" toys: Mario, Bowser, Yoshi, Donkey Kong, Luigi, Toad, and Wario. Shortly after the initial launch of the first line, mini-keychain plushes were released. What seemed like a few months later, Banzo-Kazooie beanies were showing up at EB. There was at least one other line up of toys that was released that included multiple colored Yoshi, Princess Peach, Diddy Kong, and others (I'll post about 'em when I find 'em!) Along with the normal sized toys, and mini-keychains, there were these MASSIVE giant sized beanies and talking regular sized beanies that were released. I remember they would line the very top of the walls of EB with these. I wanted that god damn giant Donkey Kong so bad but never got it. I actually found a giant Bowser beanie at a St. Vincent De Paul thrift store last year and he has become the guardian (along with Alf) of my Retro CRT (more on this baby later.)

Giant Bowser with DK for size comparison.


One quirky thing about this line up was that the quality of the plushies would differ from each shipment. The initial release of Donkey Kongs looked great, but a few of the following waves looked what we called bizarro-deformed. I know this because at one point I started hoarding Donkey Kong beanies and had upwards of 16 bizarro and non-bizarro variants. Yikes.


Bad OCD habits... Notice Bizarro-DK in the bottom right.

Do you have any of the BD&A Nintendo Beanies? Are you looking for them now? I know I am! Happy Hunting!

Monday, February 6, 2017

Contra Cabinet Restoration - Part 3 - Removing Rust and Repainting

Coin Door.
Remove paint to expose rust.
With the completion of the main cabinet, it is now time to move onto the smaller details! Everything inside this cabinet (save for the PCB - phew!) that was made of metal had some level of rust attached to it. The coin doors, every nut & bolt, even the speaker grills!

The first step was to strip the powder coating/paint off of any metal object and then see just how much rust I was dealing with. To do this, I used CitriStrip. This stuff works like magic. Place the object to be stripped in a shallow tray, coat the object in CitriStrip (I found a paint brush works best), wait the recommended time, and then use a metal scraper/wire brush to remove the paint. Repeat until all paint is gone.

Why would they make it smell good
 if the fumes are still toxic...?
More importantly, does it taste as
good as it smells?
Once all paint was removed and the rust is exposed, I used super-fine #0000 Steel wool to sand as much of the rust away from the metal as possible. I do not have access to powder-coating so I needed to find an alternative. A poster on KLOV recommended using Rustoleum Hammered Finish Spray paint and a top coat of Rustoleum Satin. The results weren't exactly like that of an original powder coated door but they are satisfactory to me. If you decide on going this route then you must make sure that the Hammered Finish layer cures completely before spraying the top-coat. You will end up with a strange spider webbing effect if you do not let your coats cure completely.

With the the brunt of the work taken care of it was now time to move onto replacing parts. The coin door locks were easily replaced using cam locks bought at home depot. Another lock was purchased for the new back door that I made. I decided on using a reproduction control panel overlay rather than hunting down NOS. The new overlay was ordered from Game On Grafix and I was extremely satisfied with the product. The original marquee light was not working so it was removed and easily fixed by splicing in a cheap replacement. New buttons and microswitches were ordered to replace the old damaged leaf-style buttons. I decided on using the original sticks and just changing the microswitches because the sticks were found to still be sound.


Next step: Putting it all together and final touches!

Sunday, February 5, 2017

Review SD: Final Fantasy XIII (Xbox 360)


We keep it simple
Tough and outright
Easy to swallow
Final Fantasy light
Yes, I'm just now finally getting around to finishing Final Fantasy XIII. Originally I had borrowed this game from a friend shortly after it's release but was unable to finish due to time constraints. Now, after picking it up on the cheap ($4 shipped off eBay), I am intent on finishing. Here we go!

GAMEPLAY: 3/5

The Battle System is fun. It's a faster, streamlined version of the traditional battle system with a quick change take on the job system - the ability to change paradigms (jobs) mid-battle creates for a heavily strategic environment. The speed of the battle system keeps most battles from getting too drawn out or boring. My only real gripe with the battle system is that there is a MOVE command missing. Certain spells and attacks (from both the enemy and player) will have a certain range of attack with the possibility of hitting multiple characters if they are bunched together. The problem without having the option of moving characters takes away any strategy this may offer and it leaves you feeling like you were playing a handicapped Grandia game.

Equipment in the game has been streamlined (or gimped depending on who you ask) so that you only have to deal with equipping a weapon and a few accessories depending on where you are in the game. At this point, they may have well just left equipment out as a whole and just created a skill system where you purchase the beneficiary aspects of the weapon/accessory and equip it on your character. They got lazy. Item creation is fun in the beginning but the novelty quickly wears off when you realize that the only challenge in creating items is how friggin' expensive it is and how hard it is to make Gil in this game. I don't need to revisit modern American economics in my JRPG, tyvm.

The world of FF13 is very narrow and straight with the exception of Gran Pulse. Often times, I caught myself just looking at the mini map in the top right of screen thinking, "oh hey look, there is a small branch out from the main path, there must be a treasure chest there." That's about the depth of the exploration of the majority of this game. The size of Gran Pulse was a nice attempt, but the novelty wears off quickly once you realize how tedious it is getting around, even with a chocobo. Had Gran Pulse been introduced closer to mid-game I may have felt better, or had more patience for it. The Mission System introduced on Gran Pulse was fun for the first 18 or so missions but quickly got stale after you realize the missions are comprised of rehashed enemies.


GRAPHICS: 5/5

This game is beautiful. There's not much more I can say about it.


MUSIC: 2/5

¿Dónde estás, NOBUO!?!? What is this elevator music that torments my ears so? Why! Why have you left us!? Change can be good, but this is like that time you were served a shit-sandwich after you told the waitress you were vegan. NO BUENO!


STORY: 2/5

Nothing new here. The tripe, cliche, pseudo-intellectual, politico-religious common fare that modern JRPG developers shovel into our fat fanboy faces when they realize that "we're hungry... we'll eat anything at this point." Character development is almost non-existent and what is there is heavy-handed and often forced into a quick cut scene. Save for Sazh and Lightning, I made little to no connection with the cast.


OVERALL: 3/5

Let it be known: When it comes to JRPGs, I feel that gameplay and story play a huge factor in how good a game is overall. Like most Final Fantasy games after VI, save for Final Fantasy XII, it's well known that Square made graphics the number one top priority. While the graphics did shine, the cliche story, lack of character development, bland music, and monotonous-linear-traveling-from-point-a-to-point-b-between-cutscene-exploration just made the game mediocre at best.


Don't do it Sazh, things might get better.

Saturday, February 4, 2017

Dynamo HS-5 restoration Part 1

I finally got my dream arcade machine! It's not something fancy, super old, or dedicated even. It's a Dynamo HS-5. The Dynamo HS-5 is a special cabinet to me even though it's just a run of the mill change-the-board out cabinet. Back in the 90's, my friends and I were obsessed with Capcom fighting games and a majority of the time we were playing Capcom Fighters on an HS-5 or Big Blue. Since the death of the arcade scene (well we're kind of in a revival right now thanks to bar-cades), it has always been a goal of mine to get an HS-5, restore it, and pop a Marvel Vs Capcom CPS2 PCB in there so it could be just like the one my friends and I would play on during the Summer of 1999 at Smiles Entertainment Center/Milford Rec in Milford, CT.

Ehli Auctions had a big arcade auction sometime last year and in this auction was a non-working HS-5 with Deer Hunter (yuck.) I playfully bid $50 with the intent of being quickly outbid and ended up winning! Luckily, the storage site was a few miles away so my u-haul pickup only cost me about $50. $100 for everything up front! Score! The best part is that I was able to sell the Deer Hunter PCB and gun for well over $150!

Probably rescued from a shit-kicker
bar in Black-Diamond.
After work that day, I threw caution to the wind and plugged the machine in to see if it would work and if anything was broken. The machine started up and everything seemed to work without a problem! Did they give me the wrong cabinet or something? My goal for the next week was simple: strip the cabinet of buttons, stickers, the CP overlay, give everything a good scrub down and give the cabinet a good once over to see what would need to be fixed. There weren't many cosmetic problems with the cabinet. The sides had a few dings that could be bondo'd and the back of the cabinet had been kicked in causing a few chunks of MDF to pop off. The biggest problem that I could see was the control panel... this thing was NOT intended to be used for a six button fighter.

Can you imagine if every hole had a button in it? What kind of hellish nightmare game?


I spent a short while trying to find a replacement control panel on KLOV but had no luck. The fact that I couldn't find a replacement led me to accept the challenge of trying to get this panel function as a 6 button fighter panel. The plan was to attach a thin piece of plywood to the underside of the board, fill in the button holes with Bondo, and then drill new spots in for the buttons and joysticks.


Success! The control panel was easily the hardest and most time consuming part of restoring this cabinet. Resurfacing the sides, front and back of the cabinet was done in under a day thanks to how fast Bondo dries.

Top-Left: Bondo / Top-Right: Sanded Bondo / Bottom-Left: Primed Bondo / Bottom Right: Bueno!


Now came the matter of finding the Marvel vs Capcom PCBs. I was able to get a great deal on a Mother board from a member of KLOV. The game board ended up coming from eBay. I took a chance and bought a caseless MVC1 board for about $80, risking that it was going to be bootleg. Luckily, it was the real deal. No clue what happened to the original case.

Reverse Seppuku: Expose you innards and experience new life!


Monday, January 30, 2017

01/31/1997: Happy 20th Anniversary Final Fantasy VII


It's hard to believe it's already been 20 years since Final Fantasy VII was released in Japan on PSX. 20 Years... that's a long time. 20 years is the kind of time it takes to turn a newborn baby into a full grown man child. Does that put the passage of time into perspective? I still can't believe it!

It feels like just the other day that I was playing this back during Freshman year of High School. That's right! I would come home from school and play for hours on end only to take a break to watch Toonami or rush my homework. The next day in school, I would be discussing the game with classmates, bragging about how fast I was plowing through the game, or just sitting there daydreaming about getting home to play the game with my younger brother. Sweet, sweet nostalgia.

Final Fantasy VII, at launch, was a special game. If you played Final Fantasy VII when it first was released then you know what I'm talking about. The game seemed so new and fresh, even to those that had already played the previous Final Fantasy titles. Everything about the game was so polished for the time. The pre-rendered 3d backgrounds were gorgeous and remain so even to this day. The FMV in the game, while looking extremely dated today, was an OMG-i'm-going-to-pee-my-pants-in-excitement feeling every time you anticipated one when the screen faded black and the Playstation started loading the disc in that certain way. The soundtrack was brilliant thanks to Nobuo Uematsu being at the pinnacle of his composing career. The 3d polygonal characters at the time were so cool - the simplified SD characters and the full size 3d battle characters were state of the art for the time. And then there are the characters of Final Fantasy VII. I don't know if it was because I was in my early teens or what, but I had never cared for or connected with the cast of an RPG like I had done with FF7. All of these things made the game superb to already experienced JRPG fans and drew in an entire new crowd of gamers that didn't like the genre prior. After finishing, I lent the game to a friend that wasn't a fan of the genre and before you knew it he was locking himself in the house binge playing it!

While the JRPG genre has been stagnating in the US the last 10 or so years, it only stands to make the old days of the genre seem that much more bittersweet. I don't see anything, short of virtual reality, revolutionizing the genre as much as Final Fantasy VII did any time soon. Here's looking forward to that remake and the hopeful resurrection of the genre!

Tuesday, November 17, 2015

Contra Konami Cabinet Restoration - Part 2

There was some really gnarly flaky swelling around the bottom of the cabinet and I wanted to take care of this first. Initially I had wanted to just cut off the bottom 12 inches of MDF and replace it with fresh MDF but thought I'd give something else a try instead. I basically soaked the bottom edge in wood glue and then clamped the MDF down to it's regular thickness between 2 pieces of sheet metal. The clamps and sheet metal were removed once the glue dried and it had worked out great!

Virtually every edge on the cabinet was nicked or swollen so I went around and cut off the edge at a 45 degree angle to prepare for Bondo re-edging.

Use a utility knife to remove all swollen or damaged corners.
Try not to angle cut deeper than 45 degrees.

I have seen people use masking tape attached to the outside of the edge to create a new edge when Bondo was applied. I initially used tape, but found that pieces of cardboard stapled to the edge held up better and it was also cheaper in the long run.

Use masking tape/cardboard to create a mold for your new corners. Take your time:
You want to replicate the original 90 degree angle as closely as possible.
Once the Bondo had dried it then became time to sand the mess up. Sanding the MDF created a funky looking cracked ice pattern whereever there was swelling. 

Remove the mold once the Bondo has dried and sand off and high areas. Start with low grit paper,
use Bondo to refill any missing areas or chunks that broke off, then resand with low grit paper.
Once you are confidant with your edges, gradually increase paper grit.


The next step, after sanding out all the imperfections, was to roll on some primer to check my work and then move onto painting. This is when everything started coming together. In between the Priming, Sanding, Painting, Sanding, etc, I was working on making a new back door and touching up the control panel.

Remember to prime after your final sand to check for any hidden imperfections.  I went with
Rustoleum White Enamel for paint because acrylic paint can't take (any) abuse.


Monday, November 16, 2015

Contra Konami Cabinet Restoration

I've always wanted to own an arcade cabinet. Sometime around 2005, I was set on getting an arcade cabinet and converting it into a Marvel vs Capcom machine that resembled the cabinet my friends and I used to play at Milford Amusement Center. Being young and impatient, I jumped on the first empty cabinet that showed up in the Connecticut craigslist ads and picked it up. Unfortunately, I didn't have the drive to finish back then so I put the cabinet on hold and left it in my Dad's basement (sorry Dad.)

8ish years pass. The combination of getting out of an apartment and moving into a house, and feeling nostalgic for the old arcade days reignited the spark. I started stalking Craigslist again for something resembling the old MVC cabinet of my youth. Once again, I jumped on the first reply I got from a seller. $50 and a Uhaul truck rental got me Contra in a dedicated Konami cabinet from a guy in Sumner, WA. The seller said it worked and that he just couldn't get the controls to work.


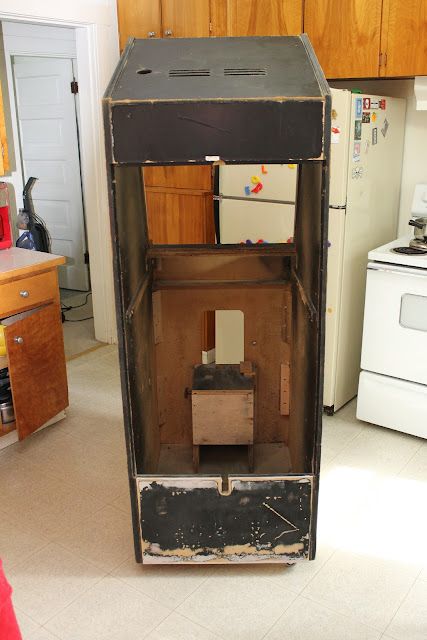
Post Hardware/Monitor Gutting


I checked out the cabinet once I got home and noticed this thing was in BAD SHAPE. The MDF on the bottom 1/4 of the cabinet was water damaged and swollen. Most of the metal (screws, bolts, nuts, speaker grills, you name it) were rusty. The isolation transformers looked scary. The cam locks in the coin doors had been drilled out, the marquee light did not work, and there was no back door to the cabinet.

I lurked on the KLOV forums for suggestions and the resounding advice was to use the cabinet as a pattern to cut a new replacement cabinet. That wasn't going to happen as I don't have the tools or know how, so I decided on giving it my all and restoring it as best as I can.


Next step: Roll it outside, and sand this beast down.